Solana to Ethereum Bridge Guide: How to Move Liquidity Without CEXs
We believe in full transparency with our readers. Some of our content includes affiliate links, and we may earn a commission through these partnerships. However, this potential compensation never influences our analysis, opinions, or reviews. Our editorial content is created independently of our marketing partnerships, and our ratings are based solely on our established evaluation criteria. Read More


Much of today’s bridging volume flows between Solana and Ethereum. Consequently, many users want to know how to bridge from Solana to Ethereum.
In this guide, we’ll focus on moving assets from Solana to Ethereum, highlighting the higher Ethereum gas fees and extra claim steps you should expect on the Ethereum side. We’ll walk through bridging step-by-step, compare the top non-custodial bridge options, and give tips to stay safe.
- In This Article
- In This Article
- Show Full Guide
How to Bridge from Solana to Ethereum: Key Takeaways
- To bridge from Solana to Ethereum, you will need to set up your wallets, find a provider, initiate a transfer on the bridge, wait, and claim your tokens.
- There are different costs associated with bridging, such as gas fees and, bridging costs, which differ on each blockchain.
- Bridging is good for users who want to farm yields on different networks, but come with risks like complexity and bridge security.
- Some of the most popular bridges include Portal, deBridge, Allbridge, Zerion, and Mayan Finance.
Solana to Ethereum Bridge – Step-by-Step Guide
So, how to bridge from Solana to Ethereum in practice? In this tutorial, we’ll use Portal by Wormhole as the example, since it’s widely used and illustrates the common lock-and-mint process (with an extra claim step on Ethereum).
The steps are similar for other bridges — once you grasp one, you can handle others. We’ll assume you’re starting with some SOL or SPL tokens in a Solana wallet (Phantom) and want to end up with assets on Ethereum.
Before you begin, make sure you have a bit of SOL and a bit of ETH available. You’ll need SOL to pay the Solana transaction fee (usually 1. Prepare Your Wallets (Phantom & Metamask)
First, set up the two wallets you’ll use: a Solana wallet and an Ethereum wallet. A popular combo is Phantom for Solana and MetaMask for Ethereum. If you haven’t already:
Install Phantom (browser extension or mobile) and create a Solana wallet. Save your secret recovery phrase safely. Once done, fund it with a small amount of SOL for gas. Even 0.1 SOL is plenty for many transactions (0.1 SOL is just a couple of cents in fees).
Install MetaMask (extension or mobile) for Ethereum. Create or import an Ethereum account. Make sure to fund it with some ETH; you must have ETH to pay the gas on the Ethereum side.
For a Solana-to-Ethereum bridge, having around $20 worth of ETH is a good cushion (you might not use all that, but it’s better to be safe than stuck). Also, if you plan to receive ERC-20 tokens (like wSOL or bridged USDC), you don’t need those tokens in your wallet beforehand – but you do need ETH to execute the claim transaction.
Phantom and MetaMask are not interchangeable. Phantom speaks Solana’s language (and now also offers an Ethereum option internally), while MetaMask speaks Ethereum’s. On the Wormhole Portal UI, you’ll actually connect both.
Some multi-chain wallets (Phantom’s multi-chain beta, Zerion wallet, Exodus, for example) can simplify this by holding both SOL and ETH accounts in one app. In that case, you might be able to connect one wallet for both chains.
But here we’ll assume the classic approach of Phantom plus MetaMask.

2. Initiate the Transfer on the Bridge Site
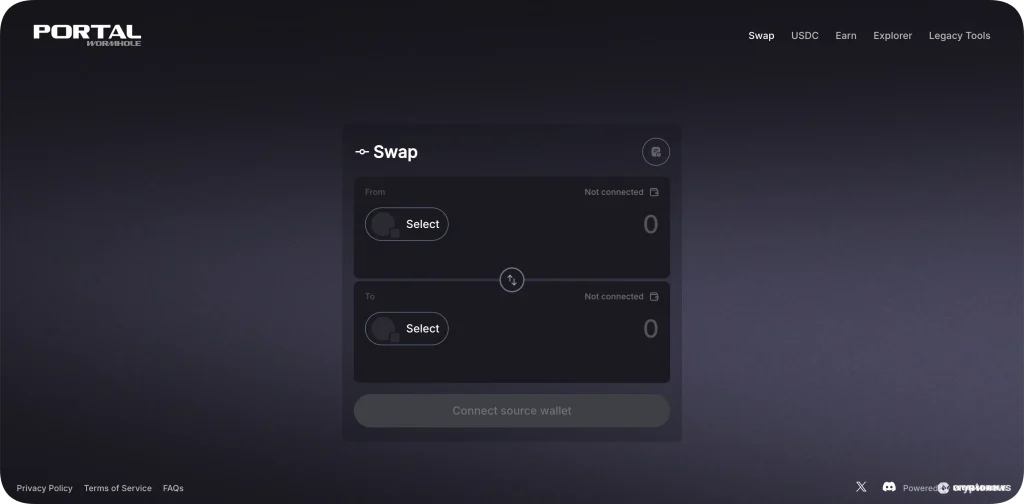
Go to the Portal Bridge website (Wormhole’s official transfer UI). Ensure you use the official site – bookmark it to avoid phishing. You’ll see an interface to select networks and tokens.
Selecting source and target on the Portal (Wormhole) bridge. Here, we choose Solana as the “From” chain and Ethereum as the “To” chain, then connect the respective wallets.
Under “From”, choose Solana as your source chain. Under “To”, select Ethereum as the destination. The app will prompt you to connect your wallets for each chain. For Solana, connect your Phantom wallet (your browser should prompt via Phantom).
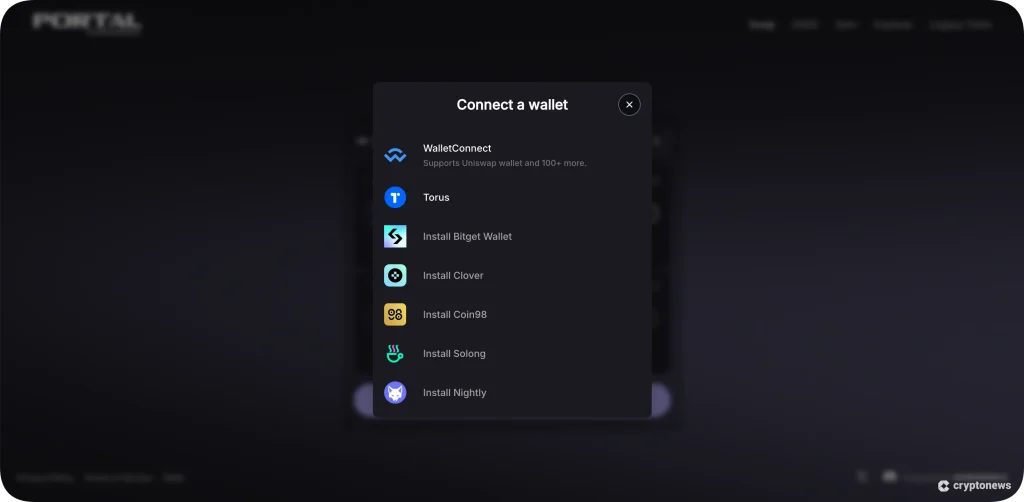
For Ethereum, connect MetaMask (the site will likely detect MetaMask if installed). Approve any connection prompts. You might see your wallet addresses displayed for each chain after connecting.
Now choose the token you want to bridge. Common options include SOL itself or SPL tokens, such as USDC and USDT. Click on the asset dropdown. If bridging SOL, select SOL. If it’s an SPL token, such as USDC, you may need to select the specific token (the Portal supports many popular tokens). Enter the Amount to transfer.
The interface should show the equivalent amount you’ll receive on Ethereum (often the same number, minus any small protocol fee if applicable). For SOL bridging, the output will display something like “wSOL (Wormhole) on Ethereum.”
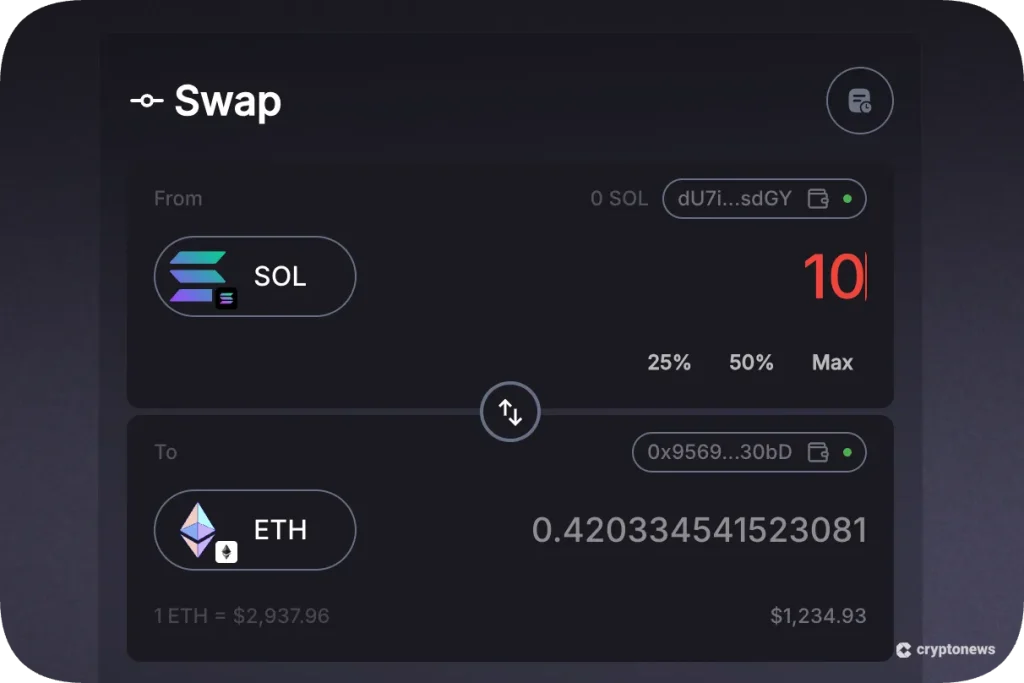
Take note of any info shown about fees. Bridges usually break down the expected fees before you confirm. For instance, Portal might show you the estimated ETH gas cost for redemption or warn that you’ll have to claim on the other side.
3. Authorize the Transaction on Solana (Source Chain)
Once everything looks correct (network, token, amount, and recipient address, which typically auto-fills as your connected Ethereum wallet), you’ll start the transfer. In Portal’s UI, clicking “Next” or “Transfer” will prompt your Phantom wallet to approve the transaction.
This is the Solana side transaction that locks your tokens into the bridge contract. For example, if you’re sending SOL, this transaction will move your SOL into Wormhole’s Solana program (effectively locking it). If you’re sending an SPL token, such as USDC, the transaction will involve the Wormhole program and your token account.
Phantom will pop up asking you to approve. You’ll see the network fee – likely something like 0.000005 SOL (just a few fractions of a penny). Go ahead and approve (enter your Phantom password if required and confirm). Within a second or two, the Solana transaction should be confirmed. You’ve now sent the funds into the bridge on Solana’s side.
The bridge smart contract on Solana has locked your tokens and emitted a message (attestation) that your tokens are ready to mint on Ethereum. This message is passed to the Wormhole guardian network to be signed. The UI will now move to the waiting/claim phase for Ethereum.
4. The Critical Waiting Period and Tracking
There is a waiting period while the cross-chain message is confirmed and posted to Ethereum. You’ll typically see a spinner or status saying “Waiting for confirmations” or similar. What’s happening is the Wormhole guardians (or equivalent validators) are verifying the Solana transaction and preparing a validation proof for Ethereum. We found that this usually takes a few minutes.
In Wormhole’s case, once a quorum of 13/19 guardians signs the attestation, it becomes available for Ethereum. The speed (5–20 minutes on average for Portal) depends on how fast Solana finalizes and how busy Ethereum is in picking up the message.
While you wait, you can track the progress on block explorers. The bridge UI often provides links. WormholeScan is a specialized explorer that shows the status of Wormhole bridge messages. Etherscan will show the eventual Ethereum transaction when it’s ready. It’s a good practice to click those links and watch the transaction progress on the explorers.
For example, WormholeScan will show something like “VAA verified, awaiting redemption”. This transparency is reassuring – you can actually see that your tokens are in transit and not lost.
If something seems stuck for an abnormally long time, do not panic. In most cases, it will either eventually go through, or you can retry the claim. (Portal has a “manual claim” option if auto redemption fails.) Generally, as long as the Solana transaction succeeded, your funds are safe in the bridge contract and just waiting on the Ethereum side for you to claim.
5. Claiming Your Tokens on Ethereum (The Expensive Final Step)
Once the guardians’ attestation is ready, the bridge UI will prompt you to claim or redeem your tokens on Ethereum. In Portal’s interface, you’ll see a button like “Claim Tokens” become clickable. This step will invoke the bridge contract on Ethereum to mint the wrapped tokens (or release liquidity) for you. Here’s where you pay the Ethereum gas fee.
Click “Claim”. Your MetaMask (or Ethereum wallet) will pop up with a transaction confirmation. It’s essentially a contract call to Wormhole’s Ethereum contract, including the proof from Solana.
Check the gas fee in MetaMask – it may automatically set a gas limit and price. If the network is congested, consider whether you want to proceed now or wait for lower gas (MetaMask will show the estimated fee in USD). You can also check a gas tracker.
When ready, approve the transaction. MetaMask will then submit it to Ethereum. This is where you spend, say, $15 of ETH. After a brief period of mining/validation (ranging from a few seconds to a minute or more, depending on Ethereum’s traffic), the transaction will be confirmed, and your bridged tokens will appear in your Ethereum wallet.
If you bridged SOL, you should now see wSOL (Wormhole SOL) in your MetaMask (you might need to add the token contract to MetaMask manually to see it. The Portal UI usually provides an “Add token” button after claiming. Remember, wSOL is an ERC-20 token on Ethereum representing your SOL. If you bridged USDC, you’d see “Wormhole USDC” (or possibly native USDC if using a different method).

Why Bridge From Solana to Ethereum and What Is the Cost?
Leaving Solana for Ethereum is about opportunity. Ethereum has deeper DeFi liquidity, more tokens, and more mature lending, trading, and yield apps. If the app you want lives on Ethereum, bridging gets you there. Big protocols and institutions still prefer Ethereum for its security record and network effects today overall.
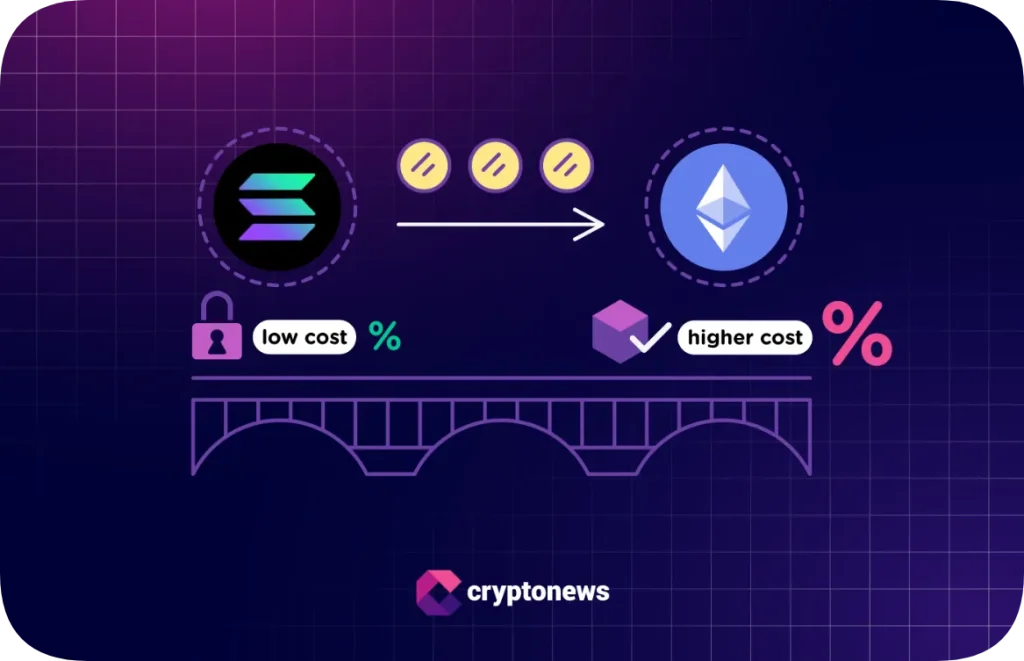
The downside is cost and friction. Solana is fast and cheap, but the Ethereum mainnet is slower, and gas fees swing from a few dollars to $50 or more. Bridging usually means tiny SOL fees plus an expensive Ethereum claim. Move larger amounts, and bridge during low gas periods when possible.
Solana vs. Ethereum: Why the Migration Is Complex
Moving assets from Solana to Ethereum sounds simple until you try it. You’re crossing between two networks that work differently, charge fees differently, and use different wallet standards.
And since this is a Solana to Ethereum move, the hard part usually isn’t Solana’s side. It’s the Ethereum side: gas, confirmations, and the extra claim step many bridges require.
🔑 Key Differences – Speed vs. Liquidity
Solana and Ethereum take very different approaches to blockchain. Solana is all about high throughput and low cost; its architecture (Proof-of-History and parallelization, for example) enables it to finalize thousands of transactions per second with negligible fees. It’s ideal for real-time use cases (such as trading and gaming) where every second and cent matter.
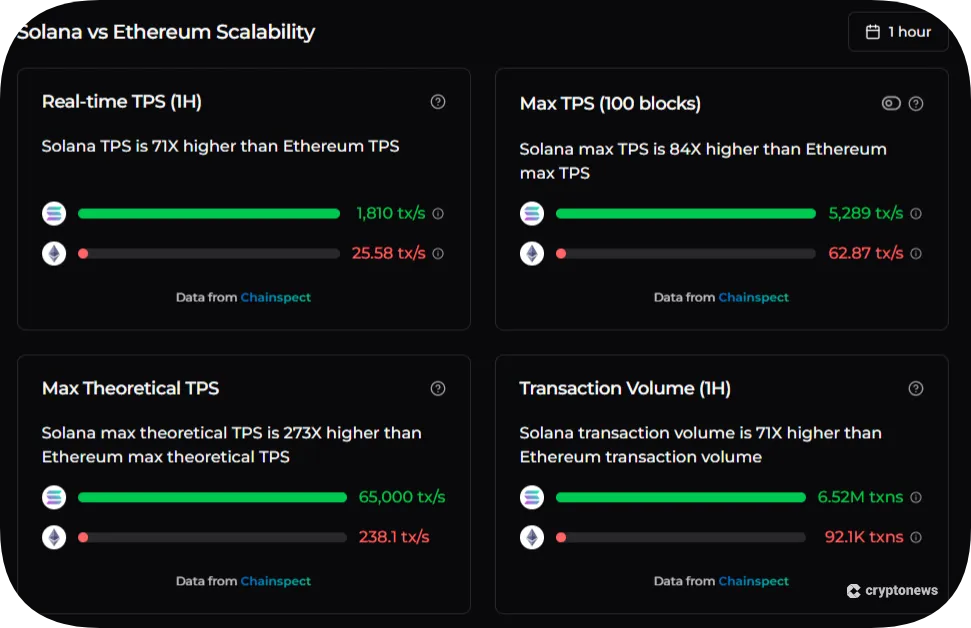
Ethereum, on the other hand, prioritized decentralization and security early on, resulting in lower base performance. Even after upgrades, Ethereum’s Layer-1 handles only around 15–30 TPS, and it relies on miners/validators bidding on gas fees. Hence, the sometimes sky-high fees on the mainnet (during congestion, simple swaps have spiked to over $50).
However, Ethereum boasts by far the largest array of decentralized finance (DeFi) apps and a much greater total value locked. For example, major lending platforms, options markets, and certain non-fungible tokens (NFTs) exist only on Ethereum.
Many investors see Ethereum as more battle-tested and secure, given its longer history and extensive decentralization, which is why billions in liquidity remain on Ethereum despite the costs.
| Chain | ⚡ Speed | 💸 Cost | 🛡️ Security |
| Solana | 🚀 Very fast | 💳 Very low fees | 🛡️ Strong |
| Ethereum (L1) | 🐢 Slower | 💰 Higher, variable gas | 🏰 Very strong |
💡 Why Decentralized (Non-CEX) Bridging?
Can’t you just withdraw from a centralized exchange? Sure, you could deposit SOL to an exchange, sell or convert it to ETH, then withdraw ETH on Ethereum. But using a CEX means giving up custody and privacy. Non-custodial bridges let you stay in control (no trusting an exchange’s solvency or enduring their withdrawal limits).
There’s no KYC or regional restrictions with decentralized bridges; no intrusive IDs, just your wallets. Security-wise, not your keys, not your crypto holds. A CEX holds your funds during transfer, whereas a bridge uses smart contracts while you hold your keys. CEX transfers are also multi-step (and exchanges charge their own fees for withdrawals).
Decentralized bridges avoid those extra fees and often complete faster for moving into DeFi. Ultimately, if you value self-custody and permissionless access to Ethereum’s ecosystem, decentralized bridging is the way.
The Core Difference: How Decentralized Bridges Work
Not all bridges work the same way under the hood. When moving from Solana to Ethereum, the bridge must somehow take an asset on Solana and credit you with an equivalent asset on Ethereum. There are two main models to achieve this.
🔒 Lock-and-Mint (Wrapped Tokens)
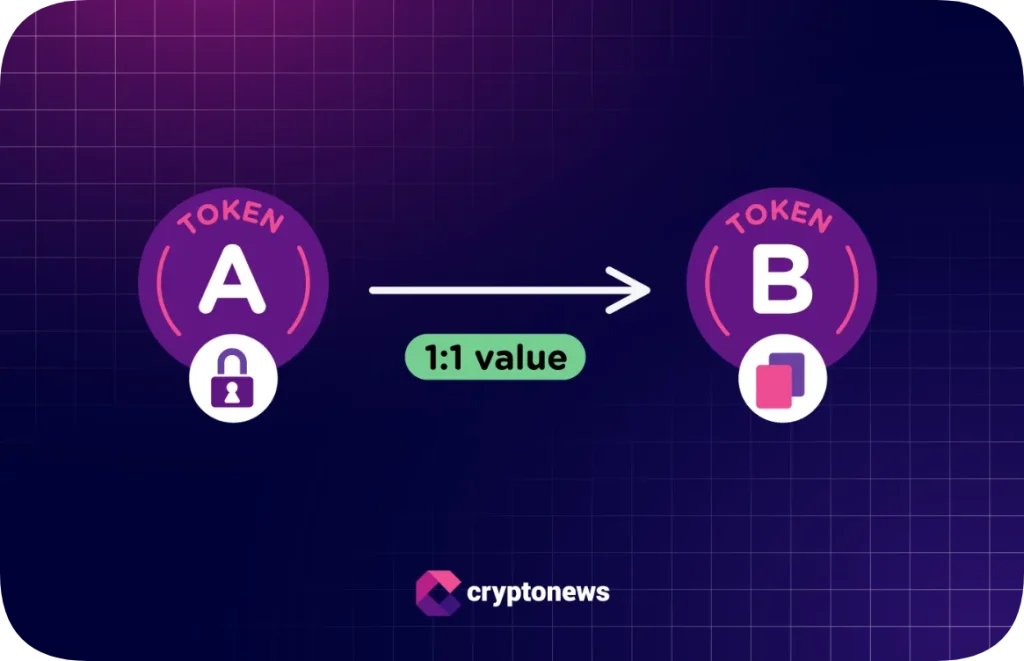
This is used by bridges like Wormhole’s Portal. Suppose you bridge 10 SOL to Ethereum. A smart contract on Solana will lock up your 10 SOL, and the bridge will mint 10 “Wrapped SOL” (wSOL) tokens on Ethereum in return.
The wSOL is an ERC-20 token that represents your Solana SOL. It’s pegged 1:1 but isn’t native SOL (it’s like an IOU). If you later bridge back, those wSOL on Ethereum get burned, and the original SOL is released on Solana. This lock/mint mechanism can apply to any token.
The benefit is that you maintain a pegged asset on Ethereum. The drawback is that these wrapped tokens sometimes have lower liquidity or need extra swaps to use. Bridges like Portal rely on a network of validators (often called guardians) to verify and sign the lock/mint events securely.
💧 Liquidity Pools / Swaps
Some newer bridges avoid creating wrapped tokens by simply swapping assets via liquidity pools. For example, Allbridge and certain aggregator bridges maintain pools of assets on each side.
If you bridge 10 USDC from Solana to Ethereum via a liquidity network, the bridge might take your 10 USDC on Solana (removing it from Solana’s pool) and simply give you 10 native USDC from their Ethereum pool.
No new token is minted; you get the real thing on the target chain. This often means faster transfers. It also spares you from managing a wrapped version. The challenge here is liquidity.
The bridge needs enough pool reserves on each side. Large transfers could incur slippage or be limited by pool size. Also, you’re trusting the pool operators’ security (often a multisig or a small validator set in Allbridge’s case).
A twist on the liquidity model is intent-based or auction-based bridging – used by the likes of Mayan Finance and deBridge’s deSwap. Here, when you initiate a transfer, a network of “solver” nodes effectively bids to give you the target asset immediately, then later claims your source asset themselves.
In practice, you can still obtain (for example) native ETH on Ethereum almost instantly in exchange for your SOL on Solana, but behind the scenes, a solver takes on the debt and will retrieve the SOL to cover it. This yields high-speed transfers (solvers compete to be fastest) and often better rates due to competition.
You don’t have to deal with wrapped tokens at all. The security here relies on economic incentives and the protocol’s ability to punish (slash) dishonest solvers. deBridge uses a similar principle with a robust validator network and slashing mechanisms.

The bottom line is that traditional bridges lock-and-mint (resulting in wrapped tokens like wSOL). In contrast, others perform cross-chain swaps via liquidity pools or intent-based auctions (often delivering native tokens). We’ll note in our bridge comparisons which model each uses, since it affects speed and what asset you end up with.
The Best Solana to Ethereum Bridges Compared (2026)
Decentralized, non-custodial bridges are the go-to for moving from Solana to Ethereum without giving up control. Below, we compare several trusted solutions. “Best” can vary; some prioritize speed, others low fees or top security.
All options listed here let you retain ownership of your funds throughout the transfer (no custodial middlemen).
| Bridge | Model | Security Model | Speed (Avg.) | SOL Fee (Est.) | ETH Claim Fee (Est.) | Use With |
|---|---|---|---|---|---|---|
| Portal (Wormhole) | Lock-and-Mint | 19 Guardians (Proof-of-Consensus) | Around 5–20 min | Tiny (fractions of a cent) | $10–30+ (variable) | Phantom + MetaMask |
| deBridge | Liquidity/Auction | Independent Validators + Staked Solvers | Less than 1 min (often instant) | Tiny (negligible SOL) | Included in transfer | Phantom (multi-chain) |
| Allbridge | Liquidity Pools | Multisig + Validators | Around 15–20 min | Tiny (SOL network fee) | Close to $5–15 (built into txn) | Phantom + MetaMask |
| Mayan Finance | Auction (Swap) | Solver Network (economic incentives) | Less than 1 min | Tiny | Included in transfer | Phantom + MetaMask |
| Zerion Wallet / Exodus | Aggregator (Wallet UI) | Uses third-party bridges under the hood | Seconds to minutes | Tiny | Varies (calculated in app) | Multi-chain wallet apps |
As of 2026, Portal by Wormhole is still a solid pick when you want a reliable, widely supported bridge. Suppose speed matters more; deBridge and Mayan use faster swap-style models. Allbridge is useful when you’re moving stablecoins across multiple chains and want broad coverage.
Wallet apps like Zerion and Exodus make the process easier by integrating bridges directly. You choose Solana to Ethereum, and the app finds a route behind the scenes. That’s beginner-friendly, but you’re also trusting the app’s routing logic instead of picking the bridge yourself.

Fees and supported tokens change fast, so always re-check before you send. Aggregators like Rubic or Jupiter can compare routes in real time.
You’ll usually need two wallets: a Solana wallet (like Phantom, one of the best Solana wallets) and an EVM wallet (like MetaMask), unless you use a multi-chain wallet that supports both.
Risks, Costs, and Security of Decentralized Bridging
Bridging is powerful, but it comes with some gotchas to be aware of. Let’s break down the total costs you likely paid (or will pay) and discuss the security aspect, since bridges have, unfortunately, been targets of hacks in the past.
The Hidden Costs: Calculating Your Total Bridge Fee
When you bridge Solana to Ethereum without a CEX, the total fee is actually the sum of a few parts:
- Solana Network Fee: This is usually trivial – on the order of 0.000005 SOL or similar. In USD, that’s less than $0.01. You’ll barely notice it. Solana’s low fees are one reason bridging out is attractive.
- Bridge Protocol Fee: Some bridges charge a fixed fee or a percentage. For example, Mayan currently takes a 0.1% fee of the amount transferred, and Allbridge charges 0.3%. Wormhole’s Portal doesn’t charge a fee for SOL itself, but if you bridge specific tokens, there might be a small fee or spread (often, they earn a bit when you swap on their integration). Always check the bridge’s info panel for any fees.
- Ethereum Gas Fee (Claim Fee): This is the big one. You pay it in ETH at the moment of claiming on Ethereum. It can range widely. On a good day, maybe it’s around $5–$10; on a bad day (network congested), it could be $30 or more. Significantly, Ethereum gas fees don’t depend on how much value you’re bridging. It’s purely about Ethereum’s gas price and the complexity of the bridge contract call.
To minimize this, try to bridge during off-peak Ethereum times (weekends, late nights UTC, often see lower gas prices). Use an Ethereum gas tracker to time your claim when the gas price is low. You can also save by batching; instead of bridging five separate times, do one larger transfer.
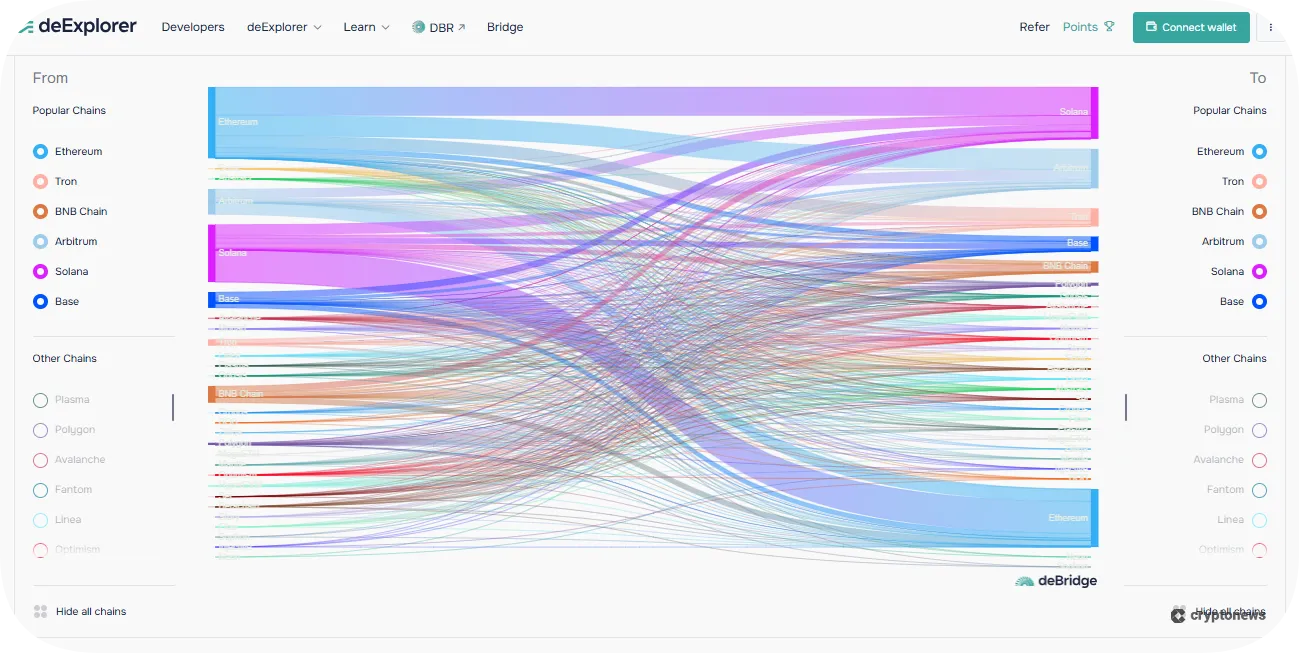
Bridge Security Models: Why Trust Wormhole and Debridge?
Security is the elephant in the room for bridges. You may have heard of bridge hacks. Bridges are appealing targets because they often hold large locked sums, effectively serving as honeypots.
The primary danger is a bug in the smart contract or validation system; an attacker who finds a flaw can potentially mint tokens out of thin air or drain the locked reserves. This has happened: in early 2022, Wormhole was hacked for 120K ETH due to a signature verification bug, allowing the hacker to mint ETH on Ethereum without proper Solana collateral.
Why are we recommending Wormhole now? Well, that exploit was a wake-up call. It was quickly patched and, importantly, Jump Crypto (one of Wormhole’s backers) stepped in to fully reimburse the stolen ETH.
Wormhole’s code has since been audited and battle-tested further. The fact that such a well-resourced team supports Wormhole gives confidence; they paid $325M to make users whole, indicating strong backing.
Its Guardian network (run by reputed validators like Everstake, Figment, etc.) now has enhanced monitoring. Wormhole also introduced features like Circle’s CCTP integration for native USDC transfers, which mitigates wrapping risk for stablecoins.
deBridge takes a different approach to security. Rather than a big pool of locked funds, deBridge’s design uses a decentralized network of validators with financial stakes. Any validator acting dishonestly can be slashed (lose their stake).
Transfers require a majority consensus of these independent nodes, similar to Wormhole’s guardians but with an open validator set. Importantly, deBridge is 0-TVL in the sense that they don’t custody large pools; liquidity is provided on the fly by solvers.
This eliminates the classic big honeypot. deBridge has undergone audits and has backing from well-known crypto VCs, indicating a level of trust in their model. Their security focuses on economic guarantees – it should cost an attacker more to cheat than any potential gain, due to staked collateral.
What Is WSOL? Why It’s Not the Same as SOL
Let’s clarify wSOL (Wrapped SOL) since it’s likely what you’ll get when bridging SOL to Ethereum. Wrapped SOL is an ERC-20 token created by the bridge to represent Solana’s SOL on Ethereum. It’s pegged 1:1 to SOL.
However, wSOL is different from SOL in a functional sense:
- wSOL lives on Ethereum: You can’t use wSOL to pay for transactions on Solana, and you can’t directly stake it to Solana validators. It’s just like any ERC-20 token; you’d use it in Ethereum dApps.
- How it’s backed: Each wSOL is backed by one SOL locked in the Wormhole contract on Solana. If you ever want to convert wSOL back to SOL, you’d bridge back (burn the wSOL on Ethereum and release SOL on Solana).
- Utility on Ethereum: wSOL can be traded or used in Ethereum DeFi. For example, you might swap wSOL for ETH on Uniswap, or provide liquidity in a wSOL-ETH pool. It essentially gives SOL holders a way to participate in Ethereum’s ecosystem without selling their SOL. Just note that wSOL’s value is tied to SOL’s price; if SOL’s price moves, wSOL follows exactly.
- Not automatically interchangeable elsewhere: Only the Wormhole (and compatible) bridges recognize wSOL. If you send wSOL to someone expecting native SOL on Solana, they’ll be unhappy. Always keep track of which chain your assets are on. There have been cases where users send wrapped tokens to a CEX or another chain’s address by mistake; those funds are often lost. Don’t send wSOL to a Solana wallet address (unless it’s via the bridge again).
In summary, wrapped tokens like wSOL are a necessary byproduct of cross-chain bridging. They work fine within the Ethereum network, but they are only redeemable through the bridge that issued them.
If you prefer not dealing with wrapped assets, consider using bridges that swap to native tokens (like deBridge or Mayan, which could give you ETH or USDC directly for your SOL). But using wSOL is perfectly okay – just remember it’s SOL, but on Ethereum.
How to Use Your Bridged Assets on Ethereum (Post-Bridge)
Now that your assets have successfully crossed into Ethereum-land, what can you do with them? Here are a few popular next steps for users who bridge Solana to Ethereum:
Swapping WSOL for Native ETH or USDC
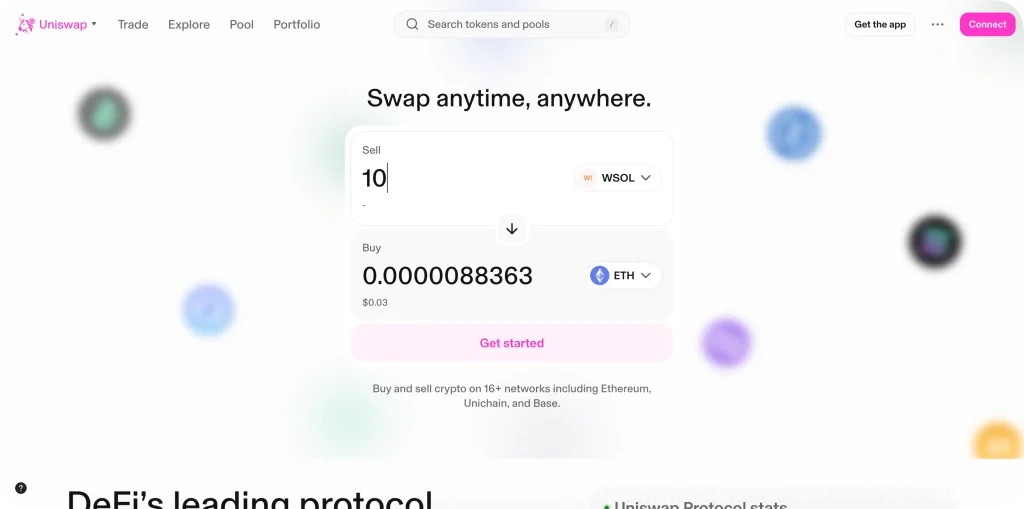
If you bridged SOL and now hold wSOL on Ethereum, you might want to convert some or all of it into a more widely used asset on Ethereum, such as ETH or USDC (a stablecoin). For instance, perhaps you bridged SOL mainly to sell it or to get stablecoins on Ethereum – you can do this via an Ethereum DEX (Decentralized Exchange).
Head over to an exchange like Uniswap or SushiSwap (or any top DEX). Connect your MetaMask. Swap wSOL to ETH (or whatever token you desire). Uniswap should auto-recognize wSOL (if not, you can paste the token contract address from Etherscan).
Keep an eye on the swap fee and price impact. wSOL has decent liquidity on some platforms, but maybe not as much as, say, WETH. After the swap, you’ll have native ETH (or USDC, etc.), which might be easier to use or reinvest.
Alternatively, if your goal was to get stablecoins onto Ethereum, you could have bridged USDC or USDT directly via Portal (and received a “Wormhole USDC” token). In that case, you might still want to swap Wormhole USDC to native USDC.
However, note that Circle’s new Cross-Chain Transfer Protocol (CCTP) allows some bridges (like Wormhole and Portal) to actually give you native USDC on the destination chain by burning it on the source. If you used that method, you wouldn’t have a wrapped version at all. But if you do have wrapped USDC (from a liquidity bridge), you can usually swap it 1:1 to native USDC through a pool.
In short, use Ethereum’s DEXes to convert your bridged tokens as needed.
Providing Liquidity and Yield Farming
One big reason to bring assets to Ethereum is to earn yield or participate in DeFi. With your bridged tokens (whether you kept them as wSOL or swapped to something else), you can now access a plethora of opportunities:
- Provide Liquidity: For example, you could provide wSOL-ETH liquidity on Uniswap or Sushi. This would earn you a share of trading fees, and perhaps additional incentives if a yield farm is built on that pool. Note that you’d be exposed to impermanent loss between wSOL and ETH, so consider your market view on SOL vs ETH. If you converted to USDC, you might put USDC into lending protocols like Aave or Compound to earn interest. Or provide USDC-ETH liquidity on Curve or Uniswap for fees.
- Yield Farming: Ethereum has numerous yield farming platforms. You could deposit tokens into a farm to earn additional rewards (like a governance token). For instance, perhaps a protocol is incentivizing a wSOL pool – you could earn those incentives in addition to the fees. Make sure to assess smart contract risks; yield farming contracts can themselves be risky if unaudited.
- Borrowing/Lending: Perhaps you want to borrow against your bridged assets. If you now have ETH or wSOL on Ethereum, you could deposit it as collateral on a platform like Aave. Aave even supports wSOL as collateral on some markets, meaning you could borrow stablecoins or other assets against your SOL holdings (now represented as wSOL). This could be a strategy if, say, you wanted to stay exposed to SOL but needed some liquidity in ETH or stablecoins for other purposes.
- Staking or Other Strategies: If you brought SOL over to possibly trade for other assets, you might end up holding some ETH, for example. You could stake that ETH via liquid staking protocols to earn Ethereum staking rewards. Or participate in Ethereum-based IDOs, NFTs, etc.
The key point is that bridging unlocks access. Once on Ethereum, you can freely interact with any dApp as if you originally had assets there. Just keep track of gas costs – doing many DeFi interactions on mainnet will incur gas each time. Consider Layer-2s if you plan to do extensive DeFi trading (though bridging to an L2 might require a different bridge or an extra hop).
Final Considerations: Pros and Cons of Bridging
Bridging from Solana to Ethereum is a powerful tool, but it’s not a one-size-fits-all solution. Let’s summarize some pros and cons to wrap up.
- Access to Ethereum’s Liquidity: By bridging, you gain access to the vast liquidity of Ethereum’s markets. This means tighter trading spreads, more buyers and sellers for your assets, and generally more efficient markets for large trades.
- DeFi & DApp Access: Ethereum’s ecosystem is unmatched in breadth. Bridging lets you use Ethereum-only services. Whether it’s a specific yield farm, lending market, NFT platform, or Layer-2 network (some Layer-2s can be reached directly via bridges, too), in short, you can diversify your crypto activities beyond Solana’s realm.
- Maintain Self-Custody: Unlike moving via a CEX, bridging keeps you in control of your funds the whole way. You’re not depositing to an exchange hoping they don’t freeze withdrawals. The assets move wallet-to-wallet. For those who champion decentralization, this is a big deal.
- Security of Ethereum Mainnet: Once on Ethereum, your assets benefit from Ethereum’s security. Ethereum is highly decentralized with thousands of validators; many consider it (and Bitcoin) the most secure base-layer. While Solana is secure in its own right, Ethereum’s longer history and larger node count give some added peace of mind for long-term holding or large amounts.
- No Need to Sell/Buy: Bridging doesn’t inherently involve selling one asset for another (unless you choose to swap after bridging). This can be beneficial if you’re trying to avoid triggering taxable events. For example, you can bridge SOL to Ethereum and maybe use it as collateral on Aave, instead of selling SOL for ETH via an exchange – the former might not count as a sale of SOL, whereas the latter would.
- High Cost: We’ve discussed this extensively, but it’s the major drawback. Bridging to the Ethereum mainnet can be expensive for small users. A $20–30 fee can be prohibitive if you’re only moving $100. This is somewhat mitigated by careful timing or using faster bridges that have slightly lower gas usage, but it’s a hurdle. In contrast, using a CEX could be cheaper for small moves (some CEXs charge only a few bucks or even waive fees on certain transfers).
- Complexity and Wait Time: Bridging isn’t instantaneous in all cases. Waiting 5 to 20 minutes and dealing with two wallets and transaction approvals is more complex than a single swap on a CEX. There’s also potential for user error: sending to the wrong chain, using the wrong token address, etc. Mistakes can be costly, so they demand more attentiveness.
- Smart Contract Risk: When you bridge, you are trusting the smart contracts and validators of that bridge. If a bug or exploit occurs, funds could be stolen or stuck. We discussed how top bridges secure themselves, but the risk is non-zero. Using a CEX also has risk (the exchange could get hacked or insolvent), so pick your poison – but at least big exchanges usually have some insurance or recourse. With a bridge hack, users are sometimes just out of luck (though in Wormhole’s case, they were bailed out). This is a risk inherent to DeFi.
- Wrapped Asset Nuances: If you end up with wrapped tokens, you might face liquidity or utility issues on Ethereum. For instance, wSOL is not as universally useful as ETH. You may have to take extra steps (swapping wrapped assets to native).
- No Customer Support Hotline: With CEXs, if something goes wrong, you can open a support ticket. With decentralized bridges, you largely rely on community channels (such as Discord and Telegram) and hope the developers assist. If you mess up (like sending it to the wrong address), there’s usually no undo. This self-reliance is the flip side of self-custody.
Conclusion
In summary, if you value control and are moving a meaningful amount, bridging is often worth it. You avoid giving up custody, and you open up many more possibilities. However, for very small amounts or non-technical users, a CEX might be a simpler (and even cheaper) option – albeit with the drawbacks of reduced trust and increased KYC requirements.
Our focus is on decentralized solutions, and thankfully, they’ve gotten much more user-friendly and secure over time. As cross-chain tech evolves (with innovations like intent-based transactions and upcoming interoperability protocols), we expect bridging to become even smoother and safer.
FAQs About Solana-to-Ethereum Bridging
Is the Solana to Ethereum bridge safe?
How much ETH do I need for the claim fee?
What happens if the bridge transaction fails?
Is it better to use a CEX than a decentralized bridge?
References
2M+
250+
8
70


About Cryptonews
Our goal is to offer a comprehensive and objective perspective on the cryptocurrency market, enabling our readers to make informed decisions in this ever-changing landscape.
Our editorial team of more than 70 crypto professionals works to maintain the highest standards of journalism and ethics. We follow strict editorial guidelines to ensure the integrity and credibility of our content.
Whether you’re looking for breaking news, expert opinions, or market insights, Cryptonews has been your go-to destination for everything cryptocurrency since 2017.
